Activate PastaHR for selected job requisitions in Workday by assigning them a profile.
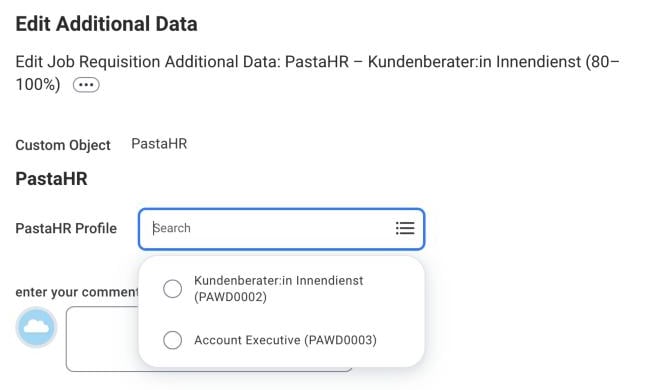
With this setup, recruiters decide directly in Workday for which job requisitions PastaHR is active. To activate PastaHR for a position, they select a profile from a dropdown on the job requisition.
Recruiters activate PastaHR by selecting a profile on the job requisition
PastaHR also processes applications that arrive directly in Workday, for example through job boards or your Workday career site. PastaHR evaluates them with JobFit, lets you invite the candidates to book an interview and lets you start a chat with them.Activating PastaHR per job requisition serves two purposes:
You decide where PastaHR is used. PastaHR only processes applications for the job requisitions you activate. Positions you want to handle without PastaHR, simply stay without a profile.
PastaHR applies the right settings. The profile defines the JobFit criteria and the settings that apply to the candidates.
Processing applications from your ATS is activated per customer. Contact support@pastahr.com to enable it.
Activate PastaHR for a job requisition (for recruiters)
1
Open the job requisition
Open the job requisition in Workday and click the ⋯ (related actions) next to its title.
2
Edit the additional data
Choose Additional Data → Edit Effective-Dated Custom Object, keep today’s date as Effective Date and click OK.
3
Choose the profile
In the PastaHR section, select the profile under PastaHR Profile and click Submit. If Workday shows further additional data steps afterwards, complete or skip them as usual.
To change the profile later, repeat these steps and pick a different one.
The setup takes about 20 minutes and is done once. You need permission to create custom objects, calculated fields and integration systems, and to edit business process definitions.
Your Workday integration with PastaHR must already be active. If you’re not sure, contact support@pastahr.com.
1
Create the profile list
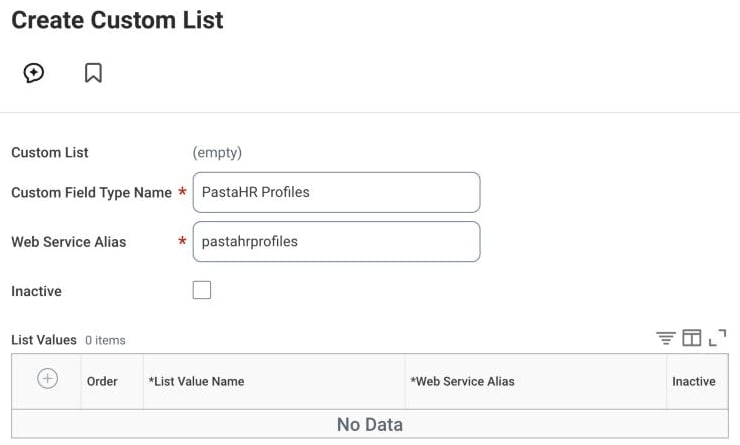
The dropdown takes its entries from a custom list. You create the list, and PastaHR fills it with your profiles. Type Create Custom List in the search bar and set:
Field
Value
Custom Field Type Name
PastaHR Profiles
Web Service Alias
pastahrprofiles
Leave List Values empty and click OK.
Let support@pastahr.com know that the list exists. We fill it with your profiles and confirm when they appear in the dropdown. You can continue with the next steps in the meantime.
2
Create the custom object
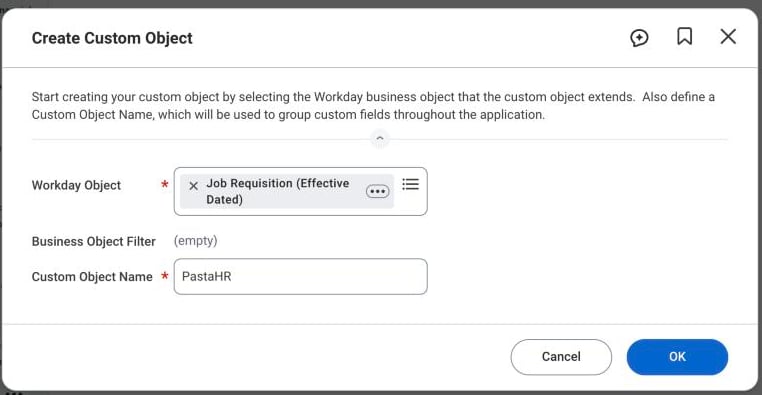
Type Create Custom Object in the search bar and set:
Field
Value
Workday Object
Job Requisition (Effective Dated)
Custom Object Name
PastaHR
Click OK and continue with these settings:
Field
Value
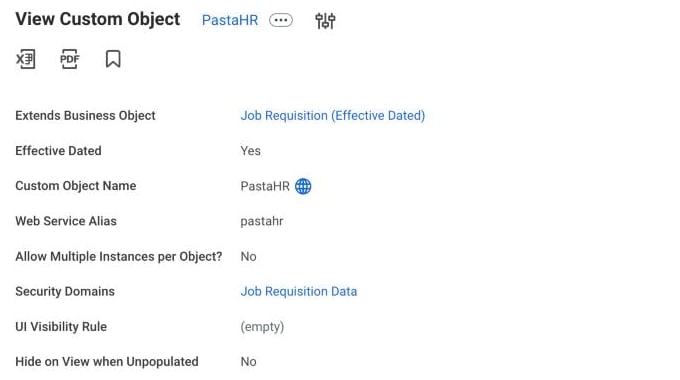
Web Service Alias
pastahr
Allow Multiple Instances per Object?
No
3
Add the profile dropdown
In the same task, add one field under Field Definitions:
Field
Value
Field Label
PastaHR Profile
Field Type
PastaHR Profiles (the list from step 1)
Web Service Alias (under Details)
pastahrProfile
Under Permissions, set the Domain to Job Requisition Data. Click OK and confirm the activation.
The finished custom object
4
Show the dropdown to recruiters
Workday edits this kind of data through the business process Edit Job Requisition Additional Data. Add a step for the new object:
Type Business Process Definitions in the search bar and open Edit Job Requisition Additional Data. If you have several definitions (e.g. one per organization), repeat this for each definition your recruiters use.
Open the related actions and choose Business Process → Edit Definition.
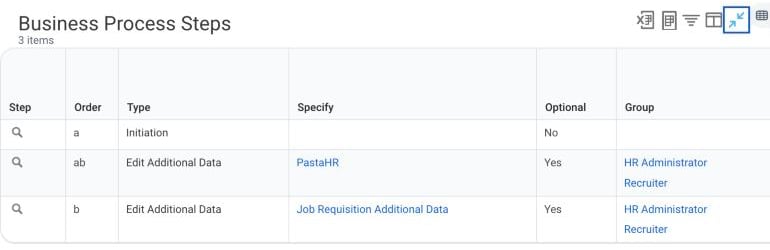
Add a row right after Initiation (e.g. order ab):
Column
Value
Type
Edit Additional Data
Specify
PastaHR
Optional
Yes
Group
The roles that should set the profile, e.g. Recruiter and HR Administrator
This step only appears when someone edits the additional data of a requisition. Creating requisitions is not affected.
5
Create the calculated field
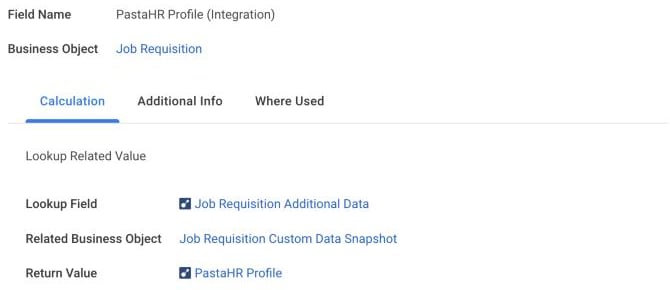
Integrations can only read fields that sit directly on the job requisition. A calculated field passes the profile selection through. Type Create Calculated Field in the search bar and set:
Field
Value
Field Name
PastaHR Profile (Integration)
Business Object
Job Requisition
Function
Lookup Related Value
Lookup Field
Job Requisition Additional Data
Return Value
PastaHR Profile
6
Create the integration system
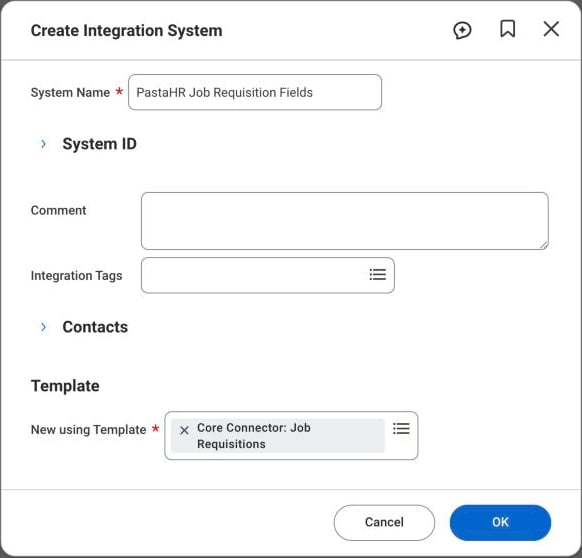
Type Create Integration System in the search bar and set:
Field
Value
System Name
PastaHR Job Requisition Fields
New using Template
Core Connector: Job Requisitions
Workday may later show the warning that the attribute Version is “Required for Launch”. You can ignore it: PastaHR only reads the field, the integration is never launched.
7
Add the field override service
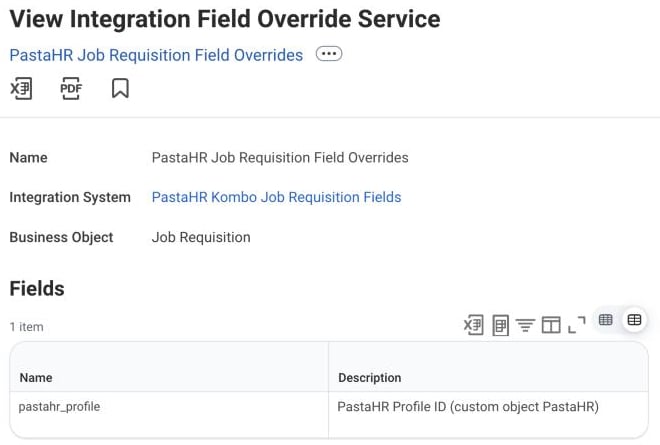
Workday opens Configure Integration Services after the previous step. Under Custom Integration Services, click +, open the prompt and choose Create → Create Integration Field Override Service:
Field
Value
Name
PastaHR Job Requisition Field Overrides
Business Object
Job Requisition
Fields → Name
pastahr_profile
Click OK in both dialogs.
8
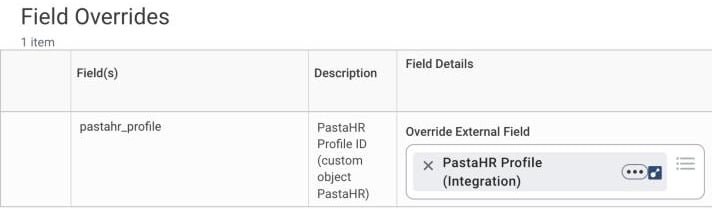
Connect the field
Type View Integration System in the search bar and open PastaHR Job Requisition Fields. Open the related actions and choose Integration System → Configure Integration Field Overrides. Next to pastahr_profile, set Override External Field to PastaHR Profile (Integration) and click OK.
9
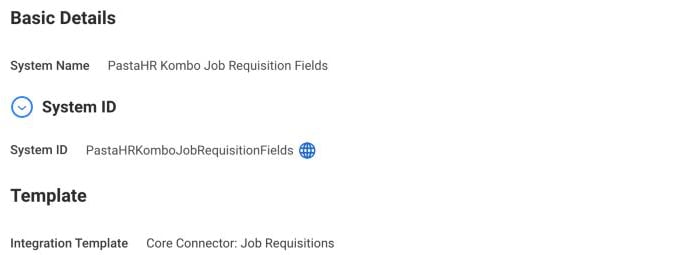
Send us the System ID
On the same integration system, expand System ID and send the value to support@pastahr.com. If you named the field differently than pastahr_profile, include its name. We activate the connection and confirm when your recruiters can start activating PastaHR for their job requisitions.
New profiles are not added automatically. Let support@pastahr.com know which profile you need and we add it to the list. The same applies if you rename or no longer use a profile.
PastaHR can't fill the profile list
PastaHR fills the list with the integration system user (ISU) you created when you connected Workday to PastaHR. If we let you know that we can’t fill the list, the ISU is missing access. To find it, type View API Clients in the search bar and open the tab API Clients for Integrations. The column Integration System User of the PastaHR API client shows its name. Its security group usually has the same name.Workday secures changes to custom lists with the domain Custom Object Management in the functional area System. Grant the ISU access to it:
Type Maintain Permissions for Security Group in the search bar and select the ISU’s security group.
Under Domain Security Policy Permissions, add Custom Object Management with View and Modify.
Run Activate Pending Security Policy Changes.
Check that the PastaHR API client includes System under Scope (Functional Areas). If it doesn’t, add it with Edit API Client for Integrations.
Why are the profile IDs shown in brackets?
Each entry shows the profile title and its ID, e.g. Account Executive (PAWD0003). The ID stays the same even if the profile title changes, so the link to the job keeps working.
Can we use different names for the objects and fields?
Yes. You can rename labels such as PastaHR Profile and the field pastahr_profile in the field override service. If you change the field name, include it when you send us the System ID. Keep the Web Service Alias pastahrprofiles of the list, because PastaHR fills the list through it.
Can we add the profile to the JobFit custom object?
No. The custom object for JobFit in Workday belongs to the job application, because every application has its own score. The profile belongs to the job requisition. Workday attaches each custom object to exactly one business object, so you need two separate custom objects.
Why is a calculated field needed?
Workday stores custom fields of a job requisition in a separate custom object. Integrations can only read fields that sit directly on the job requisition, and the calculated field bridges this step. It stores no data of its own.
Was this page helpful?
⌘I
{"docsConfig":{"theme":"almond","$schema":"https://mintlify.com/docs.json","name":"PastaHR","colors":{"primary":"#3b82f6","light":"#3b82f6","dark":"#27272a"},"logo":{"light":"https://pastahr-static.s3.eu-central-1.amazonaws.com/logos/Logo_base.png","dark":"https://pastahr-static.s3.eu-central-1.amazonaws.com/logos/Logo_white_color_icon.png","href":"https://pastahr.com"},"favicon":"https://media.brand.dev/6b9b45da-633f-42d7-b73f-8baadf991ff1.png","background":{"color":{"light":"#fafaf9","dark":"#1c1917"}},"navbar":{"links":[],"primary":{"type":"button","label":"Login","href":"https://app.pastahr.com"}},"fonts":{"family":"Inter"},"icons":{"library":"lucide"},"contextual":{"options":["copy","view"],"display":"header"},"thumbnails":{"fonts":{"family":"Inter"}},"styling":{"latex":false},"navigation":{"languages":[{"language":"de","default":true,"href":"recruiters/introduction"},{"language":"en","href":"en/recruiters/introduction"},{"language":"fr","href":"fr/recruiters/introduction"},{"language":"it","href":"it/recruiters/introduction"}]}},"deployment":{"deploymentMetadataValue":{"subdomain":"pastahr","hasAudioNarration":false,"actualSubdomain":"pastahr","customDomains":["docs.pastahr.com"],"gitSource":{"type":"github","owner":"mintlify-community","repo":"docs-pastahr-8a98c3a3","deployBranch":"main","contentDirectory":"","isPrivate":true,"mountPath":"","label":""},"chroma":{"collectionId":"cd91ac2a-6b3f-4e47-b987-762965dbfe5c","liveDeploymentHistoryId":"6ae9d65beceed668c02659ed","schemaVersion":"v3","latestBuiltDeploymentHistoryId":"6ae9d65beceed668c02659ed"},"feedback":{"thumbs":true},"entitlements":{"AI_CHAT":{"status":"DISABLED"}},"buildId":"6ae9d65beceed668c02659ed","clientVersion":"0.0.4045","searchFilterCounts":[{"language":"de","tag":"Für Recruiter","count":42},{"language":"en","tag":"For Recruiters","count":41},{"language":"fr","tag":"Pour les recruteurs","count":40},{"language":"it","tag":"Per i recruiter","count":39},{"language":"de","tag":"Konto \u0026 Team","count":6},{"language":"de","tag":"ATS-Integrationen","count":6},{"language":"en","tag":"Account \u0026 Team","count":6},{"language":"en","tag":"ATS Integrations","count":6},{"language":"fr","tag":"Intégrations ATS","count":6},{"language":"it","tag":"Integrazioni ATS","count":6},{"language":"de","tag":"KI-unterstütztes Screening","count":5},{"language":"de","tag":"Chat","count":5},{"language":"de","tag":"Insights","count":5},{"language":"en","tag":"Chat","count":5},{"language":"en","tag":"Insights","count":5},{"language":"fr","tag":"Compte \u0026 Équipe","count":5},{"language":"fr","tag":"Chat","count":5},{"language":"fr","tag":"Insights","count":5},{"language":"it","tag":"Account e team","count":5},{"language":"it","tag":"Chat","count":5},{"language":"it","tag":"Insights","count":5},{"language":"de","tag":"Bewerbungen","count":4},{"language":"de","tag":"Grundlagen","count":4},{"language":"en","tag":"AI Screening (JobFit)","count":4},{"language":"en","tag":"Get Started","count":4},{"language":"en","tag":"Applications","count":4},{"language":"fr","tag":"Présélection IA","count":4},{"language":"fr","tag":"Candidatures","count":4},{"language":"fr","tag":"Premiers pas","count":4},{"language":"it","tag":"Selezione IA","count":4},{"language":"it","tag":"Candidature","count":4},{"language":"de","tag":"Interview-Buchung","count":3},{"language":"en","tag":"Interview Booking","count":3},{"language":"fr","tag":"Réservation d'entretiens","count":3},{"language":"it","tag":"Prenotazione colloqui","count":3},{"language":"it","tag":"Per iniziare","count":3},{"language":"de","tag":"Karriereseite \u0026 Links","count":2},{"language":"en","tag":"Career Page \u0026 Links","count":2},{"language":"fr","tag":"Page carrière \u0026 Liens","count":2},{"language":"it","tag":"Pagina carriere e link","count":2}]},"assistantConfig":{"enableAskAiButton":false,"enableStarterQuestions":false,"enableContextualStarterQuestions":false,"enableAskAiSearchBar":true},"basePath":"","hasChatPermissions":false,"hasWebMcpPermissions":false,"toggles":[{"name":"kill-isr","enabled":true,"variant":{"name":"disabled","enabled":false,"feature_enabled":true},"impressionData":false},{"name":"agent-mintlify-slack","enabled":true,"variant":{"name":"disabled","enabled":false,"feature_enabled":true},"impressionData":false},{"name":"agent-integrations-settings","enabled":true,"variant":{"name":"disabled","enabled":false,"feature_enabled":true},"impressionData":false},{"name":"automations-pr-grouping","enabled":true,"variant":{"name":"disabled","enabled":false,"feature_enabled":true},"impressionData":false},{"name":"custom-prefix","enabled":true,"variant":{"name":"disabled","enabled":false,"feature_enabled":true},"impressionData":false},{"name":"analytics-v7","enabled":true,"variant":{"name":"disabled","enabled":false,"feature_enabled":true},"impressionData":false},{"name":"user-flows-analytics","enabled":true,"variant":{"name":"disabled","enabled":false,"feature_enabled":true},"impressionData":false},{"name":"no-publish-flow","enabled":true,"variant":{"name":"disabled","enabled":false,"feature_enabled":true},"impressionData":false},{"name":"workos-onboarding","enabled":true,"variant":{"name":"disabled","enabled":false,"feature_enabled":true},"impressionData":false},{"name":"llms-txt-v2","enabled":true,"variant":{"name":"disabled","enabled":false,"feature_enabled":true},"impressionData":false},{"name":"snapshot-serving-live","enabled":true,"variant":{"name":"disabled","enabled":false,"feature_enabled":true},"impressionData":false},{"name":"stripTemperatureMiddleware","enabled":true,"variant":{"name":"disabled","enabled":false,"feature_enabled":true},"impressionData":false},{"name":"support-platform-pylon-zendesk","enabled":true,"variant":{"name":"disabled","enabled":false,"feature_enabled":true},"impressionData":false},{"name":"snapshot-serving","enabled":true,"variant":{"name":"disabled","enabled":false,"feature_enabled":true},"impressionData":false},{"name":"instant-rollback","enabled":true,"variant":{"name":"disabled","enabled":false,"feature_enabled":true},"impressionData":false},{"name":"granular-notifications-server","enabled":true,"variant":{"name":"disabled","enabled":false,"feature_enabled":true},"impressionData":false},{"name":"granular-notifications","enabled":true,"variant":{"name":"disabled","enabled":false,"feature_enabled":true},"impressionData":false},{"name":"automations-fable","enabled":true,"variant":{"name":"disabled","enabled":false,"feature_enabled":true},"impressionData":false},{"name":"fixed-ai-action-pricing","enabled":true,"variant":{"name":"disabled","enabled":false,"feature_enabled":true},"impressionData":false},{"name":"automation-resolve-merge-conflict","enabled":true,"variant":{"name":"disabled","enabled":false,"feature_enabled":true},"impressionData":false},{"name":"scoped-publishing","enabled":true,"variant":{"name":"disabled","enabled":false,"feature_enabled":true},"impressionData":false},{"name":"mintql","enabled":true,"variant":{"name":"disabled","enabled":false,"feature_enabled":true},"impressionData":false},{"name":"page-level-analytics","enabled":true,"variant":{"name":"disabled","enabled":false,"feature_enabled":true},"impressionData":false},{"name":"editor-version-history-v2","enabled":true,"variant":{"name":"disabled","enabled":false,"feature_enabled":true},"impressionData":false},{"name":"billing-page-v2","enabled":true,"variant":{"name":"disabled","enabled":false,"feature_enabled":true},"impressionData":false},{"name":"full-page-search","enabled":true,"variant":{"name":"disabled","enabled":false,"feature_enabled":true},"impressionData":false},{"name":"workspace-projects","enabled":true,"variant":{"name":"disabled","enabled":false,"feature_enabled":true},"impressionData":false},{"name":"assistant-v5","enabled":true,"variant":{"name":"disabled","enabled":false,"feature_enabled":true},"impressionData":false},{"name":"byok-sep-25","enabled":true,"variant":{"name":"disabled","enabled":false,"feature_enabled":true},"impressionData":false},{"name":"fork-pr-previews","enabled":true,"variant":{"name":"disabled","enabled":false,"feature_enabled":true},"impressionData":false},{"name":"revalidation-jwt","enabled":true,"variant":{"name":"disabled","enabled":false,"feature_enabled":true},"impressionData":false},{"name":"vite-origin","enabled":true,"variant":{"name":"disabled","enabled":false,"feature_enabled":true},"impressionData":false},{"name":"billing-updated-9-15","enabled":true,"variant":{"name":"disabled","enabled":false,"feature_enabled":true},"impressionData":false},{"name":"workos-sso-scim","enabled":true,"variant":{"name":"disabled","enabled":false,"feature_enabled":true},"impressionData":false},{"name":"hobby-abuse-scan","enabled":true,"variant":{"name":"disabled","enabled":false,"feature_enabled":true},"impressionData":false},{"name":"dashboard-inbox","enabled":true,"variant":{"name":"disabled","enabled":false,"feature_enabled":true},"impressionData":false},{"name":"workos-signup","enabled":true,"variant":{"name":"disabled","enabled":false,"feature_enabled":true},"impressionData":false},{"name":"turbopuffer-dual-write","enabled":true,"variant":{"name":"disabled","enabled":false,"feature_enabled":true},"impressionData":false},{"name":"workos-enabled","enabled":true,"variant":{"name":"disabled","enabled":false,"feature_enabled":true},"impressionData":false},{"name":"approve-review-flow","enabled":true,"variant":{"name":"disabled","enabled":false,"feature_enabled":true},"impressionData":false},{"name":"sso-setup-deadline-banner","enabled":true,"variant":{"name":"disabled","enabled":false,"feature_enabled":true},"impressionData":false}],"googleFontsInlined":false},"customCss":[],"page":{"pagePath":"en/recruiters/workday-profile-selection","slug":"/en/recruiters/workday-profile-selection","pageMetadata":{"title":"Workday: Activate PastaHR for Job Requisitions","sidebarTitle":"Workday: Activate PastaHR","description":"Activate PastaHR for selected job requisitions in Workday by assigning them a profile.","keywords":["Workday","profile","job requisition","custom object","integration system","field override"],"href":"/en/recruiters/workday-profile-selection"},"description":{"compiledSource":"\"use strict\";\nconst {jsx: _jsx} = arguments[0];\nconst {useMDXComponents: _provideComponents} = arguments[0];\nfunction _createMdxContent(props) {\n const _components = {\n p: \"p\",\n ..._provideComponents(),\n ...props.components\n };\n return _jsx(_components.p, {\n children: \"Activate PastaHR for selected job requisitions in Workday by assigning them a profile.\"\n });\n}\nfunction MDXContent(props = {}) {\n const {wrapper: MDXLayout} = {\n ..._provideComponents(),\n ...props.components\n };\n return MDXLayout ? _jsx(MDXLayout, {\n ...props,\n children: _jsx(_createMdxContent, {\n ...props\n })\n }) : _createMdxContent(props);\n}\nreturn {\n default: MDXContent\n};\n","frontmatter":{},"scope":{}},"pageType":"default","mdx":{"mdxSource":{"compiledSource":"\"use strict\";const{Fragment:_Fragment,jsx:_jsx,jsxs:_jsxs}=arguments[0];const{useMDXComponents:_provideComponents}=arguments[0];function _createMdxContent(props){const _components={a:`a`,code:`code`,em:`em`,li:`li`,ol:`ol`,p:`p`,strong:`strong`,tbody:`tbody`,td:`td`,th:`th`,thead:`thead`,tr:`tr`,ul:`ul`,..._provideComponents(),...props.components},{Accordion,AccordionGroup,Frame,Heading,Note,OptimizedImage,Step,Steps,Table,Tip}=_components;if(!Accordion)_missingMdxReference(`Accordion`,true);if(!AccordionGroup)_missingMdxReference(`AccordionGroup`,true);if(!Frame)_missingMdxReference(`Frame`,true);if(!Heading)_missingMdxReference(`Heading`,true);if(!Note)_missingMdxReference(`Note`,true);if(!OptimizedImage)_missingMdxReference(`OptimizedImage`,true);if(!Step)_missingMdxReference(`Step`,true);if(!Steps)_missingMdxReference(`Steps`,true);if(!Table)_missingMdxReference(`Table`,true);if(!Tip)_missingMdxReference(`Tip`,true);return _jsxs(_Fragment,{children:[_jsx(_components.p,{children:`With this setup, recruiters decide directly in Workday for which job requisitions PastaHR is active. To activate PastaHR for a position, they select a profile from a dropdown on the job requisition.`}),`\n`,_jsx(Frame,{caption:`Recruiters activate PastaHR by selecting a profile on the job requisition`,children:_jsx(OptimizedImage,{src:`https://mintcdn.com/pastahr/I_ApXQIYETXlppDf/images/workday-flow-00-recruiter-dropdown.png?fit=max\u0026auto=format\u0026n=I_ApXQIYETXlppDf\u0026q=85\u0026s=0c964da5962b3c624b3d5148eada946e`,alt:`PastaHR Profile dropdown in Workday`,\"data-og-width\":`660`,width:`660`,\"data-og-height\":`390`,height:`390`,\"data-path\":`images/workday-flow-00-recruiter-dropdown.png`,\"data-optimize\":`true`,\"data-opv\":`3`,srcset:`https://mintcdn.com/pastahr/I_ApXQIYETXlppDf/images/workday-flow-00-recruiter-dropdown.png?w=280\u0026fit=max\u0026auto=format\u0026n=I_ApXQIYETXlppDf\u0026q=85\u0026s=b00baf31d308ba9d8d16ca80c18debbb 280w, https://mintcdn.com/pastahr/I_ApXQIYETXlppDf/images/workday-flow-00-recruiter-dropdown.png?w=560\u0026fit=max\u0026auto=format\u0026n=I_ApXQIYETXlppDf\u0026q=85\u0026s=85e2cc4d4f0cf32c09906b6d206a9b60 560w, https://mintcdn.com/pastahr/I_ApXQIYETXlppDf/images/workday-flow-00-recruiter-dropdown.png?w=840\u0026fit=max\u0026auto=format\u0026n=I_ApXQIYETXlppDf\u0026q=85\u0026s=09515d3f9f39f6aed835fbe69a33ea0c 840w, https://mintcdn.com/pastahr/I_ApXQIYETXlppDf/images/workday-flow-00-recruiter-dropdown.png?w=1100\u0026fit=max\u0026auto=format\u0026n=I_ApXQIYETXlppDf\u0026q=85\u0026s=d5b26ee98d4e55af57d0ffa8e9d7c2e8 1100w, https://mintcdn.com/pastahr/I_ApXQIYETXlppDf/images/workday-flow-00-recruiter-dropdown.png?w=1650\u0026fit=max\u0026auto=format\u0026n=I_ApXQIYETXlppDf\u0026q=85\u0026s=556bc9a3aa844dd5defe275cd0bbc699 1650w, https://mintcdn.com/pastahr/I_ApXQIYETXlppDf/images/workday-flow-00-recruiter-dropdown.png?w=2500\u0026fit=max\u0026auto=format\u0026n=I_ApXQIYETXlppDf\u0026q=85\u0026s=ffc962e27b69f15218713b6f32b125c6 2500w`})}),`\n`,_jsx(Heading,{level:`2`,id:`why-you-activate-pastahr-per-job-requisition`,children:`Why you activate PastaHR per job requisition`}),`\n`,_jsxs(_components.p,{children:[`PastaHR also processes applications that arrive directly in Workday, for example through job boards or your Workday career site. PastaHR evaluates them with `,_jsx(_components.a,{href:`/en/recruiters/ai-screening`,children:`JobFit`}),`, lets you invite the candidates to `,_jsx(_components.a,{href:`/en/recruiters/interview-booking`,children:`book an interview`}),` and lets you start a chat with them.`]}),`\n`,_jsx(_components.p,{children:`Activating PastaHR per job requisition serves two purposes:`}),`\n`,_jsxs(_components.ul,{children:[`\n`,_jsxs(_components.li,{children:[_jsx(_components.strong,{children:`You decide where PastaHR is used.`}),` PastaHR only processes applications for the job requisitions you activate. Positions you want to handle without PastaHR, simply stay without a profile.`]}),`\n`,_jsxs(_components.li,{children:[_jsx(_components.strong,{children:`PastaHR applies the right settings.`}),` The profile defines the JobFit criteria and the settings that apply to the candidates.`]}),`\n`]}),`\n`,_jsx(Note,{children:_jsxs(_components.p,{children:[`Processing applications from your ATS is activated per customer. Contact `,_jsx(_components.a,{href:`mailto:support@pastahr.com`,children:`support@pastahr.com`}),` to enable it.`]})}),`\n`,_jsx(Heading,{level:`2`,id:`how-it-works`,children:`How it works`}),`\n`,_jsxs(_components.ol,{children:[`\n`,_jsx(_components.li,{children:`PastaHR fills a list in Workday with your profiles. When you want to create a new profile, let us know and we add it to the list.`}),`\n`,_jsx(_components.li,{children:`A recruiter selects a profile on the job requisition.`}),`\n`,_jsx(_components.li,{children:`PastaHR reads the selection with the next sync and links the job to the profile.`}),`\n`]}),`\n`,_jsx(Heading,{level:`2`,id:`activate-pastahr-for-a-job-requisition-for-recruiters`,children:`Activate PastaHR for a job requisition (for recruiters)`}),`\n`,_jsxs(Steps,{children:[_jsx(Step,{title:`Open the job requisition`,children:_jsxs(_components.p,{children:[`Open the job requisition in Workday and click the `,_jsx(_components.strong,{children:`⋯`}),` (related actions) next to its title.`]})}),_jsx(Step,{title:`Edit the additional data`,children:_jsxs(_components.p,{children:[`Choose `,_jsx(_components.strong,{children:`Additional Data → Edit Effective-Dated Custom Object`}),`, keep today’s date as `,_jsx(_components.strong,{children:`Effective Date`}),` and click `,_jsx(_components.strong,{children:`OK`}),`.`]})}),_jsx(Step,{title:`Choose the profile`,children:_jsxs(_components.p,{children:[`In the `,_jsx(_components.strong,{children:`PastaHR`}),` section, select the profile under `,_jsx(_components.strong,{children:`PastaHR Profile`}),` and click `,_jsx(_components.strong,{children:`Submit`}),`. If Workday shows further additional data steps afterwards, complete or skip them as usual.`]})})]}),`\n`,_jsx(_components.p,{children:`To change the profile later, repeat these steps and pick a different one.`}),`\n`,_jsx(Heading,{level:`2`,id:`setup-for-workday-administrators`,children:`Setup (for Workday administrators)`}),`\n`,_jsx(_components.p,{children:`The setup takes about 20 minutes and is done once. You need permission to create custom objects, calculated fields and integration systems, and to edit business process definitions.`}),`\n`,_jsx(Note,{children:_jsxs(_components.p,{children:[`Your Workday integration with PastaHR must already be active. If you’re not sure, contact `,_jsx(_components.a,{href:`mailto:support@pastahr.com`,children:`support@pastahr.com`}),`.`]})}),`\n`,_jsxs(Steps,{children:[_jsxs(Step,{title:`Create the profile list`,children:[_jsxs(_components.p,{children:[`The dropdown takes its entries from a custom list. You create the list, and PastaHR fills it with your profiles. Type `,_jsx(_components.strong,{children:`Create Custom List`}),` in the search bar and set:`]}),_jsxs(Table,{children:[_jsx(_components.thead,{children:_jsxs(_components.tr,{children:[_jsx(_components.th,{children:`Field`}),_jsx(_components.th,{children:`Value`})]})}),_jsxs(_components.tbody,{children:[_jsxs(_components.tr,{children:[_jsx(_components.td,{children:_jsx(_components.strong,{children:`Custom Field Type Name`})}),_jsx(_components.td,{children:_jsx(_components.code,{children:`PastaHR Profiles`})})]}),_jsxs(_components.tr,{children:[_jsx(_components.td,{children:_jsx(_components.strong,{children:`Web Service Alias`})}),_jsx(_components.td,{children:_jsx(_components.code,{children:`pastahrprofiles`})})]})]})]}),_jsxs(_components.p,{children:[`Leave `,_jsx(_components.strong,{children:`List Values`}),` empty and click `,_jsx(_components.strong,{children:`OK`}),`.`]}),_jsx(Frame,{children:_jsx(OptimizedImage,{src:`https://mintcdn.com/pastahr/I_ApXQIYETXlppDf/images/workday-flow-09-create-custom-list.png?fit=max\u0026auto=format\u0026n=I_ApXQIYETXlppDf\u0026q=85\u0026s=aca750eb4e66c4dc5e1e6a31c53da4a6`,alt:`Create Custom List in Workday`,\"data-og-width\":`740`,width:`740`,\"data-og-height\":`445`,height:`445`,\"data-path\":`images/workday-flow-09-create-custom-list.png`,\"data-optimize\":`true`,\"data-opv\":`3`,srcset:`https://mintcdn.com/pastahr/I_ApXQIYETXlppDf/images/workday-flow-09-create-custom-list.png?w=280\u0026fit=max\u0026auto=format\u0026n=I_ApXQIYETXlppDf\u0026q=85\u0026s=be4ebe2892d9c9dd54e39dc5f4225ab0 280w, https://mintcdn.com/pastahr/I_ApXQIYETXlppDf/images/workday-flow-09-create-custom-list.png?w=560\u0026fit=max\u0026auto=format\u0026n=I_ApXQIYETXlppDf\u0026q=85\u0026s=09a392b0587c6abe6109d4b373719982 560w, https://mintcdn.com/pastahr/I_ApXQIYETXlppDf/images/workday-flow-09-create-custom-list.png?w=840\u0026fit=max\u0026auto=format\u0026n=I_ApXQIYETXlppDf\u0026q=85\u0026s=fedb00a14d379e688f428b5dd0f5f65c 840w, https://mintcdn.com/pastahr/I_ApXQIYETXlppDf/images/workday-flow-09-create-custom-list.png?w=1100\u0026fit=max\u0026auto=format\u0026n=I_ApXQIYETXlppDf\u0026q=85\u0026s=0cbe186e63815e0e10915bc0ec47a1bb 1100w, https://mintcdn.com/pastahr/I_ApXQIYETXlppDf/images/workday-flow-09-create-custom-list.png?w=1650\u0026fit=max\u0026auto=format\u0026n=I_ApXQIYETXlppDf\u0026q=85\u0026s=1ea74bb2a576622cfdc8b900f7948df7 1650w, https://mintcdn.com/pastahr/I_ApXQIYETXlppDf/images/workday-flow-09-create-custom-list.png?w=2500\u0026fit=max\u0026auto=format\u0026n=I_ApXQIYETXlppDf\u0026q=85\u0026s=4cfd1cd2ab74a2a8529bc27fce65c28c 2500w`})}),_jsxs(_components.p,{children:[`Let `,_jsx(_components.a,{href:`mailto:support@pastahr.com`,children:`support@pastahr.com`}),` know that the list exists. We fill it with your profiles and confirm when they appear in the dropdown. You can continue with the next steps in the meantime.`]})]}),_jsxs(Step,{title:`Create the custom object`,children:[_jsxs(_components.p,{children:[`Type `,_jsx(_components.strong,{children:`Create Custom Object`}),` in the search bar and set:`]}),_jsxs(Table,{children:[_jsx(_components.thead,{children:_jsxs(_components.tr,{children:[_jsx(_components.th,{children:`Field`}),_jsx(_components.th,{children:`Value`})]})}),_jsxs(_components.tbody,{children:[_jsxs(_components.tr,{children:[_jsx(_components.td,{children:_jsx(_components.strong,{children:`Workday Object`})}),_jsx(_components.td,{children:`Job Requisition (Effective Dated)`})]}),_jsxs(_components.tr,{children:[_jsx(_components.td,{children:_jsx(_components.strong,{children:`Custom Object Name`})}),_jsx(_components.td,{children:_jsx(_components.code,{children:`PastaHR`})})]})]})]}),_jsx(Frame,{children:_jsx(OptimizedImage,{src:`https://mintcdn.com/pastahr/1cnmA6tUoO7dylWB/images/workday-flow-01-create-custom-object.png?fit=max\u0026auto=format\u0026n=1cnmA6tUoO7dylWB\u0026q=85\u0026s=3a42265626e1cf7cab79c2b4cfe970ac`,alt:`Create Custom Object in Workday`,\"data-og-width\":`762`,width:`762`,\"data-og-height\":`395`,height:`395`,\"data-path\":`images/workday-flow-01-create-custom-object.png`,\"data-optimize\":`true`,\"data-opv\":`3`,srcset:`https://mintcdn.com/pastahr/1cnmA6tUoO7dylWB/images/workday-flow-01-create-custom-object.png?w=280\u0026fit=max\u0026auto=format\u0026n=1cnmA6tUoO7dylWB\u0026q=85\u0026s=4efbf4df5cef30740073eda07392ae48 280w, https://mintcdn.com/pastahr/1cnmA6tUoO7dylWB/images/workday-flow-01-create-custom-object.png?w=560\u0026fit=max\u0026auto=format\u0026n=1cnmA6tUoO7dylWB\u0026q=85\u0026s=97fdb66595229c3fc567d3dafd1124c5 560w, https://mintcdn.com/pastahr/1cnmA6tUoO7dylWB/images/workday-flow-01-create-custom-object.png?w=840\u0026fit=max\u0026auto=format\u0026n=1cnmA6tUoO7dylWB\u0026q=85\u0026s=6b5ca503f27413584c58e36011eae2b7 840w, https://mintcdn.com/pastahr/1cnmA6tUoO7dylWB/images/workday-flow-01-create-custom-object.png?w=1100\u0026fit=max\u0026auto=format\u0026n=1cnmA6tUoO7dylWB\u0026q=85\u0026s=bf6533f3b166486201707b2f8b62cc77 1100w, https://mintcdn.com/pastahr/1cnmA6tUoO7dylWB/images/workday-flow-01-create-custom-object.png?w=1650\u0026fit=max\u0026auto=format\u0026n=1cnmA6tUoO7dylWB\u0026q=85\u0026s=36170c11a8bf5755539bbb1ddea79f6f 1650w, https://mintcdn.com/pastahr/1cnmA6tUoO7dylWB/images/workday-flow-01-create-custom-object.png?w=2500\u0026fit=max\u0026auto=format\u0026n=1cnmA6tUoO7dylWB\u0026q=85\u0026s=800f15c005b9ad62efa01e734569554a 2500w`})}),_jsxs(_components.p,{children:[`Click `,_jsx(_components.strong,{children:`OK`}),` and continue with these settings:`]}),_jsxs(Table,{children:[_jsx(_components.thead,{children:_jsxs(_components.tr,{children:[_jsx(_components.th,{children:`Field`}),_jsx(_components.th,{children:`Value`})]})}),_jsxs(_components.tbody,{children:[_jsxs(_components.tr,{children:[_jsx(_components.td,{children:_jsx(_components.strong,{children:`Web Service Alias`})}),_jsx(_components.td,{children:_jsx(_components.code,{children:`pastahr`})})]}),_jsxs(_components.tr,{children:[_jsx(_components.td,{children:_jsx(_components.strong,{children:`Allow Multiple Instances per Object?`})}),_jsx(_components.td,{children:`No`})]})]})]})]}),_jsxs(Step,{title:`Add the profile dropdown`,children:[_jsxs(_components.p,{children:[`In the same task, add one field under `,_jsx(_components.strong,{children:`Field Definitions`}),`:`]}),_jsxs(Table,{children:[_jsx(_components.thead,{children:_jsxs(_components.tr,{children:[_jsx(_components.th,{children:`Field`}),_jsx(_components.th,{children:`Value`})]})}),_jsxs(_components.tbody,{children:[_jsxs(_components.tr,{children:[_jsx(_components.td,{children:_jsx(_components.strong,{children:`Field Label`})}),_jsx(_components.td,{children:_jsx(_components.code,{children:`PastaHR Profile`})})]}),_jsxs(_components.tr,{children:[_jsx(_components.td,{children:_jsx(_components.strong,{children:`Field Type`})}),_jsxs(_components.td,{children:[_jsx(_components.code,{children:`PastaHR Profiles`}),` (the list from step 1)`]})]}),_jsxs(_components.tr,{children:[_jsxs(_components.td,{children:[_jsx(_components.strong,{children:`Web Service Alias`}),` (under `,_jsx(_components.strong,{children:`Details`}),`)`]}),_jsx(_components.td,{children:_jsx(_components.code,{children:`pastahrProfile`})})]})]})]}),_jsxs(_components.p,{children:[`Under `,_jsx(_components.strong,{children:`Permissions`}),`, set the `,_jsx(_components.strong,{children:`Domain`}),` to `,_jsx(_components.strong,{children:`Job Requisition Data`}),`. Click `,_jsx(_components.strong,{children:`OK`}),` and confirm the activation.`]}),_jsx(Frame,{caption:`The finished custom object`,children:_jsx(OptimizedImage,{src:`https://mintcdn.com/pastahr/1cnmA6tUoO7dylWB/images/workday-flow-02-custom-object-summary.png?fit=max\u0026auto=format\u0026n=1cnmA6tUoO7dylWB\u0026q=85\u0026s=c4e0d4f8457971c001cd520f1a702e9e`,alt:`PastaHR custom object in Workday`,\"data-og-width\":`680`,width:`680`,\"data-og-height\":`380`,height:`380`,\"data-path\":`images/workday-flow-02-custom-object-summary.png`,\"data-optimize\":`true`,\"data-opv\":`3`,srcset:`https://mintcdn.com/pastahr/1cnmA6tUoO7dylWB/images/workday-flow-02-custom-object-summary.png?w=280\u0026fit=max\u0026auto=format\u0026n=1cnmA6tUoO7dylWB\u0026q=85\u0026s=944151a9c2be9e1cd6d71d2fed618546 280w, https://mintcdn.com/pastahr/1cnmA6tUoO7dylWB/images/workday-flow-02-custom-object-summary.png?w=560\u0026fit=max\u0026auto=format\u0026n=1cnmA6tUoO7dylWB\u0026q=85\u0026s=ff59bf23a4177ec1280335130affe0a6 560w, https://mintcdn.com/pastahr/1cnmA6tUoO7dylWB/images/workday-flow-02-custom-object-summary.png?w=840\u0026fit=max\u0026auto=format\u0026n=1cnmA6tUoO7dylWB\u0026q=85\u0026s=81ab1b0cd7e6c9caf724af344b9d6b5d 840w, https://mintcdn.com/pastahr/1cnmA6tUoO7dylWB/images/workday-flow-02-custom-object-summary.png?w=1100\u0026fit=max\u0026auto=format\u0026n=1cnmA6tUoO7dylWB\u0026q=85\u0026s=8277b66ab312798f2f51248b9afade74 1100w, https://mintcdn.com/pastahr/1cnmA6tUoO7dylWB/images/workday-flow-02-custom-object-summary.png?w=1650\u0026fit=max\u0026auto=format\u0026n=1cnmA6tUoO7dylWB\u0026q=85\u0026s=ed4b861cbb705d9c187cdfb96f9fefa1 1650w, https://mintcdn.com/pastahr/1cnmA6tUoO7dylWB/images/workday-flow-02-custom-object-summary.png?w=2500\u0026fit=max\u0026auto=format\u0026n=1cnmA6tUoO7dylWB\u0026q=85\u0026s=4c87cd3976f9ca22d9af9a96a76cd49e 2500w`})})]}),_jsxs(Step,{title:`Show the dropdown to recruiters`,children:[_jsxs(_components.p,{children:[`Workday edits this kind of data through the business process `,_jsx(_components.strong,{children:`Edit Job Requisition Additional Data`}),`. Add a step for the new object:`]}),_jsxs(_components.ol,{children:[`\n`,_jsxs(_components.li,{children:[`Type `,_jsx(_components.strong,{children:`Business Process Definitions`}),` in the search bar and open `,_jsx(_components.strong,{children:`Edit Job Requisition Additional Data`}),`. If you have several definitions (e.g. one per organization), repeat this for each definition your recruiters use.`]}),`\n`,_jsxs(_components.li,{children:[`Open the related actions and choose `,_jsx(_components.strong,{children:`Business Process → Edit Definition`}),`.`]}),`\n`,_jsxs(_components.li,{children:[`Add a row right after `,_jsx(_components.strong,{children:`Initiation`}),` (e.g. order `,_jsx(_components.code,{children:`ab`}),`):`]}),`\n`]}),_jsxs(Table,{children:[_jsx(_components.thead,{children:_jsxs(_components.tr,{children:[_jsx(_components.th,{children:`Column`}),_jsx(_components.th,{children:`Value`})]})}),_jsxs(_components.tbody,{children:[_jsxs(_components.tr,{children:[_jsx(_components.td,{children:_jsx(_components.strong,{children:`Type`})}),_jsx(_components.td,{children:`Edit Additional Data`})]}),_jsxs(_components.tr,{children:[_jsx(_components.td,{children:_jsx(_components.strong,{children:`Specify`})}),_jsx(_components.td,{children:_jsx(_components.code,{children:`PastaHR`})})]}),_jsxs(_components.tr,{children:[_jsx(_components.td,{children:_jsx(_components.strong,{children:`Optional`})}),_jsx(_components.td,{children:`Yes`})]}),_jsxs(_components.tr,{children:[_jsx(_components.td,{children:_jsx(_components.strong,{children:`Group`})}),_jsxs(_components.td,{children:[`The roles that should set the profile, e.g. `,_jsx(_components.em,{children:`Recruiter`}),` and `,_jsx(_components.em,{children:`HR Administrator`})]})]})]})]}),_jsx(Frame,{children:_jsx(OptimizedImage,{src:`https://mintcdn.com/pastahr/1cnmA6tUoO7dylWB/images/workday-flow-03-business-process-step.png?fit=max\u0026auto=format\u0026n=1cnmA6tUoO7dylWB\u0026q=85\u0026s=eb3956b06fc9056bda6522e44128cb7f`,alt:`Business process step for PastaHR`,\"data-og-width\":`770`,width:`770`,\"data-og-height\":`250`,height:`250`,\"data-path\":`images/workday-flow-03-business-process-step.png`,\"data-optimize\":`true`,\"data-opv\":`3`,srcset:`https://mintcdn.com/pastahr/1cnmA6tUoO7dylWB/images/workday-flow-03-business-process-step.png?w=280\u0026fit=max\u0026auto=format\u0026n=1cnmA6tUoO7dylWB\u0026q=85\u0026s=043344f2c165621aaf2d0d44d5c7612c 280w, https://mintcdn.com/pastahr/1cnmA6tUoO7dylWB/images/workday-flow-03-business-process-step.png?w=560\u0026fit=max\u0026auto=format\u0026n=1cnmA6tUoO7dylWB\u0026q=85\u0026s=e1d6a07476dee84fe36b2d2458643234 560w, https://mintcdn.com/pastahr/1cnmA6tUoO7dylWB/images/workday-flow-03-business-process-step.png?w=840\u0026fit=max\u0026auto=format\u0026n=1cnmA6tUoO7dylWB\u0026q=85\u0026s=c6751752c3506a6f8f0c31d94ee7dd25 840w, https://mintcdn.com/pastahr/1cnmA6tUoO7dylWB/images/workday-flow-03-business-process-step.png?w=1100\u0026fit=max\u0026auto=format\u0026n=1cnmA6tUoO7dylWB\u0026q=85\u0026s=564e3554a85dad0ca05c20db7cc94061 1100w, https://mintcdn.com/pastahr/1cnmA6tUoO7dylWB/images/workday-flow-03-business-process-step.png?w=1650\u0026fit=max\u0026auto=format\u0026n=1cnmA6tUoO7dylWB\u0026q=85\u0026s=93d4cca3b495993c492b4bb1496a5e36 1650w, https://mintcdn.com/pastahr/1cnmA6tUoO7dylWB/images/workday-flow-03-business-process-step.png?w=2500\u0026fit=max\u0026auto=format\u0026n=1cnmA6tUoO7dylWB\u0026q=85\u0026s=adedbaafa76488b095e0929afc4b4499 2500w`})}),_jsx(Note,{children:_jsx(_components.p,{children:`This step only appears when someone edits the additional data of a requisition. Creating requisitions is not affected.`})})]}),_jsxs(Step,{title:`Create the calculated field`,children:[_jsxs(_components.p,{children:[`Integrations can only read fields that sit directly on the job requisition. A calculated field passes the profile selection through. Type `,_jsx(_components.strong,{children:`Create Calculated Field`}),` in the search bar and set:`]}),_jsxs(Table,{children:[_jsx(_components.thead,{children:_jsxs(_components.tr,{children:[_jsx(_components.th,{children:`Field`}),_jsx(_components.th,{children:`Value`})]})}),_jsxs(_components.tbody,{children:[_jsxs(_components.tr,{children:[_jsx(_components.td,{children:_jsx(_components.strong,{children:`Field Name`})}),_jsx(_components.td,{children:_jsx(_components.code,{children:`PastaHR Profile (Integration)`})})]}),_jsxs(_components.tr,{children:[_jsx(_components.td,{children:_jsx(_components.strong,{children:`Business Object`})}),_jsx(_components.td,{children:`Job Requisition`})]}),_jsxs(_components.tr,{children:[_jsx(_components.td,{children:_jsx(_components.strong,{children:`Function`})}),_jsx(_components.td,{children:`Lookup Related Value`})]}),_jsxs(_components.tr,{children:[_jsx(_components.td,{children:_jsx(_components.strong,{children:`Lookup Field`})}),_jsx(_components.td,{children:`Job Requisition Additional Data`})]}),_jsxs(_components.tr,{children:[_jsx(_components.td,{children:_jsx(_components.strong,{children:`Return Value`})}),_jsx(_components.td,{children:`PastaHR Profile`})]})]})]}),_jsx(Frame,{children:_jsx(OptimizedImage,{src:`https://mintcdn.com/pastahr/I_ApXQIYETXlppDf/images/workday-flow-04-calculated-field.png?fit=max\u0026auto=format\u0026n=I_ApXQIYETXlppDf\u0026q=85\u0026s=907aa6d5cd150810ea83f095789ecee5`,alt:`Calculated field PastaHR Profile (Integration)`,\"data-og-width\":`670`,width:`670`,\"data-og-height\":`290`,height:`290`,\"data-path\":`images/workday-flow-04-calculated-field.png`,\"data-optimize\":`true`,\"data-opv\":`3`,srcset:`https://mintcdn.com/pastahr/I_ApXQIYETXlppDf/images/workday-flow-04-calculated-field.png?w=280\u0026fit=max\u0026auto=format\u0026n=I_ApXQIYETXlppDf\u0026q=85\u0026s=ac9385b1d0b032e577fc443076fc2a21 280w, https://mintcdn.com/pastahr/I_ApXQIYETXlppDf/images/workday-flow-04-calculated-field.png?w=560\u0026fit=max\u0026auto=format\u0026n=I_ApXQIYETXlppDf\u0026q=85\u0026s=536d380eae05d3962f825983978ef406 560w, https://mintcdn.com/pastahr/I_ApXQIYETXlppDf/images/workday-flow-04-calculated-field.png?w=840\u0026fit=max\u0026auto=format\u0026n=I_ApXQIYETXlppDf\u0026q=85\u0026s=4795658c4b2808a96c255aad9ef74cd5 840w, https://mintcdn.com/pastahr/I_ApXQIYETXlppDf/images/workday-flow-04-calculated-field.png?w=1100\u0026fit=max\u0026auto=format\u0026n=I_ApXQIYETXlppDf\u0026q=85\u0026s=02c3cc7fb1123bd7e4c1dbfd2ddbeb25 1100w, https://mintcdn.com/pastahr/I_ApXQIYETXlppDf/images/workday-flow-04-calculated-field.png?w=1650\u0026fit=max\u0026auto=format\u0026n=I_ApXQIYETXlppDf\u0026q=85\u0026s=e512c3384618ed0b469ff84d41c1639a 1650w, https://mintcdn.com/pastahr/I_ApXQIYETXlppDf/images/workday-flow-04-calculated-field.png?w=2500\u0026fit=max\u0026auto=format\u0026n=I_ApXQIYETXlppDf\u0026q=85\u0026s=a5c8d34672989311e0cc46b35618ff10 2500w`})})]}),_jsxs(Step,{title:`Create the integration system`,children:[_jsxs(_components.p,{children:[`Type `,_jsx(_components.strong,{children:`Create Integration System`}),` in the search bar and set:`]}),_jsxs(Table,{children:[_jsx(_components.thead,{children:_jsxs(_components.tr,{children:[_jsx(_components.th,{children:`Field`}),_jsx(_components.th,{children:`Value`})]})}),_jsxs(_components.tbody,{children:[_jsxs(_components.tr,{children:[_jsx(_components.td,{children:_jsx(_components.strong,{children:`System Name`})}),_jsx(_components.td,{children:_jsx(_components.code,{children:`PastaHR Job Requisition Fields`})})]}),_jsxs(_components.tr,{children:[_jsx(_components.td,{children:_jsx(_components.strong,{children:`New using Template`})}),_jsx(_components.td,{children:`Core Connector: Job Requisitions`})]})]})]}),_jsx(Frame,{children:_jsx(OptimizedImage,{src:`https://mintcdn.com/pastahr/1cnmA6tUoO7dylWB/images/workday-flow-05-create-integration-system.png?fit=max\u0026auto=format\u0026n=1cnmA6tUoO7dylWB\u0026q=85\u0026s=18558f24c4d3cca899d990db972e06cb`,alt:`Create Integration System`,\"data-og-width\":`582`,width:`582`,\"data-og-height\":`558`,height:`558`,\"data-path\":`images/workday-flow-05-create-integration-system.png`,\"data-optimize\":`true`,\"data-opv\":`3`,srcset:`https://mintcdn.com/pastahr/1cnmA6tUoO7dylWB/images/workday-flow-05-create-integration-system.png?w=280\u0026fit=max\u0026auto=format\u0026n=1cnmA6tUoO7dylWB\u0026q=85\u0026s=c0cd350858f7c7871c412b18b945c0b0 280w, https://mintcdn.com/pastahr/1cnmA6tUoO7dylWB/images/workday-flow-05-create-integration-system.png?w=560\u0026fit=max\u0026auto=format\u0026n=1cnmA6tUoO7dylWB\u0026q=85\u0026s=46f329f3ef35e8e35434ce821680d888 560w, https://mintcdn.com/pastahr/1cnmA6tUoO7dylWB/images/workday-flow-05-create-integration-system.png?w=840\u0026fit=max\u0026auto=format\u0026n=1cnmA6tUoO7dylWB\u0026q=85\u0026s=a7ba9dd316647c8f56e6151b4f4d77af 840w, https://mintcdn.com/pastahr/1cnmA6tUoO7dylWB/images/workday-flow-05-create-integration-system.png?w=1100\u0026fit=max\u0026auto=format\u0026n=1cnmA6tUoO7dylWB\u0026q=85\u0026s=87a64c0a19424733c0ae4ffc0a5b9cef 1100w, https://mintcdn.com/pastahr/1cnmA6tUoO7dylWB/images/workday-flow-05-create-integration-system.png?w=1650\u0026fit=max\u0026auto=format\u0026n=1cnmA6tUoO7dylWB\u0026q=85\u0026s=ffc5229b1f6002cfc54f3af68e1fc18b 1650w, https://mintcdn.com/pastahr/1cnmA6tUoO7dylWB/images/workday-flow-05-create-integration-system.png?w=2500\u0026fit=max\u0026auto=format\u0026n=1cnmA6tUoO7dylWB\u0026q=85\u0026s=82239c11885cd4cb80a11d72f3464d5d 2500w`})}),_jsx(Tip,{children:_jsxs(_components.p,{children:[`Workday may later show the warning that the attribute `,_jsx(_components.strong,{children:`Version`}),` is “Required for Launch”. You can ignore it: PastaHR only reads the field, the integration is never launched.`]})})]}),_jsxs(Step,{title:`Add the field override service`,children:[_jsxs(_components.p,{children:[`Workday opens `,_jsx(_components.strong,{children:`Configure Integration Services`}),` after the previous step. Under `,_jsx(_components.strong,{children:`Custom Integration Services`}),`, click `,_jsx(_components.strong,{children:`+`}),`, open the prompt and choose `,_jsx(_components.strong,{children:`Create → Create Integration Field Override Service`}),`:`]}),_jsxs(Table,{children:[_jsx(_components.thead,{children:_jsxs(_components.tr,{children:[_jsx(_components.th,{children:`Field`}),_jsx(_components.th,{children:`Value`})]})}),_jsxs(_components.tbody,{children:[_jsxs(_components.tr,{children:[_jsx(_components.td,{children:_jsx(_components.strong,{children:`Name`})}),_jsx(_components.td,{children:_jsx(_components.code,{children:`PastaHR Job Requisition Field Overrides`})})]}),_jsxs(_components.tr,{children:[_jsx(_components.td,{children:_jsx(_components.strong,{children:`Business Object`})}),_jsx(_components.td,{children:`Job Requisition`})]}),_jsxs(_components.tr,{children:[_jsx(_components.td,{children:_jsx(_components.strong,{children:`Fields → Name`})}),_jsx(_components.td,{children:_jsx(_components.code,{children:`pastahr_profile`})})]})]})]}),_jsxs(_components.p,{children:[`Click `,_jsx(_components.strong,{children:`OK`}),` in both dialogs.`]}),_jsx(Frame,{children:_jsx(OptimizedImage,{src:`https://mintcdn.com/pastahr/I_ApXQIYETXlppDf/images/workday-flow-06-field-override-service.png?fit=max\u0026auto=format\u0026n=I_ApXQIYETXlppDf\u0026q=85\u0026s=8f5c6cdc02a5f704c000c00e7656d02f`,alt:`Field override service with the field pastahr_profile`,\"data-og-width\":`660`,width:`660`,\"data-og-height\":`445`,height:`445`,\"data-path\":`images/workday-flow-06-field-override-service.png`,\"data-optimize\":`true`,\"data-opv\":`3`,srcset:`https://mintcdn.com/pastahr/I_ApXQIYETXlppDf/images/workday-flow-06-field-override-service.png?w=280\u0026fit=max\u0026auto=format\u0026n=I_ApXQIYETXlppDf\u0026q=85\u0026s=a7dc9fd2b2f0c71a294c7570d5aaf58e 280w, https://mintcdn.com/pastahr/I_ApXQIYETXlppDf/images/workday-flow-06-field-override-service.png?w=560\u0026fit=max\u0026auto=format\u0026n=I_ApXQIYETXlppDf\u0026q=85\u0026s=795981daca9b45cd2214ab79203df853 560w, https://mintcdn.com/pastahr/I_ApXQIYETXlppDf/images/workday-flow-06-field-override-service.png?w=840\u0026fit=max\u0026auto=format\u0026n=I_ApXQIYETXlppDf\u0026q=85\u0026s=b763ad5657c289e3173afa86126eb84c 840w, https://mintcdn.com/pastahr/I_ApXQIYETXlppDf/images/workday-flow-06-field-override-service.png?w=1100\u0026fit=max\u0026auto=format\u0026n=I_ApXQIYETXlppDf\u0026q=85\u0026s=4ffc8b618fb9c5bc06cd6ae31cbe2fe6 1100w, https://mintcdn.com/pastahr/I_ApXQIYETXlppDf/images/workday-flow-06-field-override-service.png?w=1650\u0026fit=max\u0026auto=format\u0026n=I_ApXQIYETXlppDf\u0026q=85\u0026s=434e4af97470cead2d0a6d9781c86b3e 1650w, https://mintcdn.com/pastahr/I_ApXQIYETXlppDf/images/workday-flow-06-field-override-service.png?w=2500\u0026fit=max\u0026auto=format\u0026n=I_ApXQIYETXlppDf\u0026q=85\u0026s=939ab2a51700d44f82098e42318409f3 2500w`})})]}),_jsxs(Step,{title:`Connect the field`,children:[_jsxs(_components.p,{children:[`Type `,_jsx(_components.strong,{children:`View Integration System`}),` in the search bar and open `,_jsx(_components.strong,{children:`PastaHR Job Requisition Fields`}),`. Open the related actions and choose `,_jsx(_components.strong,{children:`Integration System → Configure Integration Field Overrides`}),`. Next to `,_jsx(_components.code,{children:`pastahr_profile`}),`, set `,_jsx(_components.strong,{children:`Override External Field`}),` to `,_jsx(_components.strong,{children:`PastaHR Profile (Integration)`}),` and click `,_jsx(_components.strong,{children:`OK`}),`.`]}),_jsx(Frame,{children:_jsx(OptimizedImage,{src:`https://mintcdn.com/pastahr/I_ApXQIYETXlppDf/images/workday-flow-08-field-override-mapping.png?fit=max\u0026auto=format\u0026n=I_ApXQIYETXlppDf\u0026q=85\u0026s=afb83978bd821a45561aa35cd47c0cb3`,alt:`Field override pastahr_profile mapped to the calculated field`,\"data-og-width\":`712`,width:`712`,\"data-og-height\":`209`,height:`209`,\"data-path\":`images/workday-flow-08-field-override-mapping.png`,\"data-optimize\":`true`,\"data-opv\":`3`,srcset:`https://mintcdn.com/pastahr/I_ApXQIYETXlppDf/images/workday-flow-08-field-override-mapping.png?w=280\u0026fit=max\u0026auto=format\u0026n=I_ApXQIYETXlppDf\u0026q=85\u0026s=a615f01343d4599a6890f5f554e28656 280w, https://mintcdn.com/pastahr/I_ApXQIYETXlppDf/images/workday-flow-08-field-override-mapping.png?w=560\u0026fit=max\u0026auto=format\u0026n=I_ApXQIYETXlppDf\u0026q=85\u0026s=0e5afc11c347814ec341003d88ee0420 560w, https://mintcdn.com/pastahr/I_ApXQIYETXlppDf/images/workday-flow-08-field-override-mapping.png?w=840\u0026fit=max\u0026auto=format\u0026n=I_ApXQIYETXlppDf\u0026q=85\u0026s=435bcce5abcc9c3c4bb6a58632cf8bb3 840w, https://mintcdn.com/pastahr/I_ApXQIYETXlppDf/images/workday-flow-08-field-override-mapping.png?w=1100\u0026fit=max\u0026auto=format\u0026n=I_ApXQIYETXlppDf\u0026q=85\u0026s=ac61461ec87270902564e5ae5712cd19 1100w, https://mintcdn.com/pastahr/I_ApXQIYETXlppDf/images/workday-flow-08-field-override-mapping.png?w=1650\u0026fit=max\u0026auto=format\u0026n=I_ApXQIYETXlppDf\u0026q=85\u0026s=5a6b6b6e175baedcda9bc7c32bdd77f0 1650w, https://mintcdn.com/pastahr/I_ApXQIYETXlppDf/images/workday-flow-08-field-override-mapping.png?w=2500\u0026fit=max\u0026auto=format\u0026n=I_ApXQIYETXlppDf\u0026q=85\u0026s=cc1d1c4a225cd45b3245bb724933ad98 2500w`})})]}),_jsxs(Step,{title:`Send us the System ID`,children:[_jsxs(_components.p,{children:[`On the same integration system, expand `,_jsx(_components.strong,{children:`System ID`}),` and send the value to `,_jsx(_components.a,{href:`mailto:support@pastahr.com`,children:`support@pastahr.com`}),`. If you named the field differently than `,_jsx(_components.code,{children:`pastahr_profile`}),`, include its name. We activate the connection and confirm when your recruiters can start activating PastaHR for their job requisitions.`]}),_jsx(Frame,{children:_jsx(OptimizedImage,{src:`https://mintcdn.com/pastahr/1cnmA6tUoO7dylWB/images/workday-flow-07-system-id.png?fit=max\u0026auto=format\u0026n=1cnmA6tUoO7dylWB\u0026q=85\u0026s=5858aaa301126d5db64b3b6cde6df5c9`,alt:`System ID of the integration system`,\"data-og-width\":`690`,width:`690`,\"data-og-height\":`255`,height:`255`,\"data-path\":`images/workday-flow-07-system-id.png`,\"data-optimize\":`true`,\"data-opv\":`3`,srcset:`https://mintcdn.com/pastahr/1cnmA6tUoO7dylWB/images/workday-flow-07-system-id.png?w=280\u0026fit=max\u0026auto=format\u0026n=1cnmA6tUoO7dylWB\u0026q=85\u0026s=af2d4648e471203a0b16207cabbea780 280w, https://mintcdn.com/pastahr/1cnmA6tUoO7dylWB/images/workday-flow-07-system-id.png?w=560\u0026fit=max\u0026auto=format\u0026n=1cnmA6tUoO7dylWB\u0026q=85\u0026s=42ddc0d9977e250414c441ac4c2b0394 560w, https://mintcdn.com/pastahr/1cnmA6tUoO7dylWB/images/workday-flow-07-system-id.png?w=840\u0026fit=max\u0026auto=format\u0026n=1cnmA6tUoO7dylWB\u0026q=85\u0026s=db48a454d11bf43f27f1a44aa76eddab 840w, https://mintcdn.com/pastahr/1cnmA6tUoO7dylWB/images/workday-flow-07-system-id.png?w=1100\u0026fit=max\u0026auto=format\u0026n=1cnmA6tUoO7dylWB\u0026q=85\u0026s=d39608e467c0fe19b6bebb38034cca3b 1100w, https://mintcdn.com/pastahr/1cnmA6tUoO7dylWB/images/workday-flow-07-system-id.png?w=1650\u0026fit=max\u0026auto=format\u0026n=1cnmA6tUoO7dylWB\u0026q=85\u0026s=08686e3ae725408968e1f27b66a3af9d 1650w, https://mintcdn.com/pastahr/1cnmA6tUoO7dylWB/images/workday-flow-07-system-id.png?w=2500\u0026fit=max\u0026auto=format\u0026n=1cnmA6tUoO7dylWB\u0026q=85\u0026s=dd76c6462e2ccb56e41010205c119c27 2500w`})})]})]}),`\n`,_jsx(Heading,{level:`2`,id:`test-the-setup`,children:`Test the setup`}),`\n`,_jsxs(_components.ol,{children:[`\n`,_jsxs(_components.li,{children:[`Activate PastaHR for a test requisition as described above under `,_jsx(_components.strong,{children:`Activate PastaHR for a job requisition`}),`.`]}),`\n`,_jsxs(_components.li,{children:[`Check the selection: open the requisition’s related actions and choose `,_jsx(_components.strong,{children:`Additional Data → View All As Of`}),`. The profile appears under `,_jsx(_components.strong,{children:`PastaHR`}),`.`]}),`\n`,_jsx(_components.li,{children:`Within a few minutes, the job in PastaHR is linked to the selected profile.`}),`\n`]}),`\n`,_jsx(Heading,{level:`2`,id:`faq`,children:`FAQ`}),`\n`,_jsxs(AccordionGroup,{children:[_jsx(Accordion,{title:`A new profile doesn't appear in the dropdown`,id:`a-new-profile-doesnt-appear-in-the-dropdown`,children:_jsxs(_components.p,{children:[`New profiles are not added automatically. Let `,_jsx(_components.a,{href:`mailto:support@pastahr.com`,children:`support@pastahr.com`}),` know which profile you need and we add it to the list. The same applies if you rename or no longer use a profile.`]})}),_jsxs(Accordion,{title:`PastaHR can't fill the profile list`,id:`pastahr-cant-fill-the-profile-list`,children:[_jsxs(_components.p,{children:[`PastaHR fills the list with the integration system user (ISU) you created when you connected Workday to PastaHR. If we let you know that we can’t fill the list, the ISU is missing access. To find it, type `,_jsx(_components.strong,{children:`View API Clients`}),` in the search bar and open the tab `,_jsx(_components.strong,{children:`API Clients for Integrations`}),`. The column `,_jsx(_components.strong,{children:`Integration System User`}),` of the PastaHR API client shows its name. Its security group usually has the same name.`]}),_jsxs(_components.p,{children:[`Workday secures changes to custom lists with the domain `,_jsx(_components.strong,{children:`Custom Object Management`}),` in the functional area `,_jsx(_components.strong,{children:`System`}),`. Grant the ISU access to it:`]}),_jsxs(_components.ol,{children:[`\n`,_jsxs(_components.li,{children:[`Type `,_jsx(_components.strong,{children:`Maintain Permissions for Security Group`}),` in the search bar and select the ISU’s security group.`]}),`\n`,_jsxs(_components.li,{children:[`Under `,_jsx(_components.strong,{children:`Domain Security Policy Permissions`}),`, add `,_jsx(_components.strong,{children:`Custom Object Management`}),` with `,_jsx(_components.strong,{children:`View and Modify`}),`.`]}),`\n`,_jsxs(_components.li,{children:[`Run `,_jsx(_components.strong,{children:`Activate Pending Security Policy Changes`}),`.`]}),`\n`,_jsxs(_components.li,{children:[`Check that the PastaHR API client includes `,_jsx(_components.strong,{children:`System`}),` under `,_jsx(_components.strong,{children:`Scope (Functional Areas)`}),`. If it doesn’t, add it with `,_jsx(_components.strong,{children:`Edit API Client for Integrations`}),`.`]}),`\n`]})]}),_jsx(Accordion,{title:`Why are the profile IDs shown in brackets?`,id:`why-are-the-profile-ids-shown-in-brackets`,children:_jsxs(_components.p,{children:[`Each entry shows the profile title and its ID, e.g. `,_jsx(_components.em,{children:`Account Executive (PAWD0003)`}),`. The ID stays the same even if the profile title changes, so the link to the job keeps working.`]})}),_jsx(Accordion,{title:`Can we use different names for the objects and fields?`,id:`can-we-use-different-names-for-the-objects-and-fields`,children:_jsxs(_components.p,{children:[`Yes. You can rename labels such as `,_jsx(_components.strong,{children:`PastaHR Profile`}),` and the field `,_jsx(_components.code,{children:`pastahr_profile`}),` in the field override service. If you change the field name, include it when you send us the System ID. Keep the Web Service Alias `,_jsx(_components.code,{children:`pastahrprofiles`}),` of the list, because PastaHR fills the list through it.`]})}),_jsx(Accordion,{title:`Can we add the profile to the JobFit custom object?`,id:`can-we-add-the-profile-to-the-jobfit-custom-object`,children:_jsxs(_components.p,{children:[`No. The custom object for `,_jsx(_components.a,{href:`/en/recruiters/jobfit-im-ats`,children:`JobFit in Workday`}),` belongs to the `,_jsx(_components.strong,{children:`job application`}),`, because every application has its own score. The profile belongs to the `,_jsx(_components.strong,{children:`job requisition`}),`. Workday attaches each custom object to exactly one business object, so you need two separate custom objects.`]})}),_jsx(Accordion,{title:`Why is a calculated field needed?`,id:`why-is-a-calculated-field-needed`,children:_jsx(_components.p,{children:`Workday stores custom fields of a job requisition in a separate custom object. Integrations can only read fields that sit directly on the job requisition, and the calculated field bridges this step. It stores no data of its own.`})})]})]})}function MDXContent(props={}){const{wrapper:MDXLayout}={..._provideComponents(),...props.components};return MDXLayout?_jsx(MDXLayout,{...props,children:_jsx(_createMdxContent,{...props})}):_createMdxContent(props)}return{default:MDXContent};function _missingMdxReference(id,component){throw new Error(`Expected `+(component?`component`:`object`)+\" `\"+id+\"` to be defined: you likely forgot to import, pass, or provide it.\")}","frontmatter":{},"scope":{"config":{},"pageMetadata":{"title":"Workday: Activate PastaHR for Job Requisitions","sidebarTitle":"Workday: Activate PastaHR","description":"Activate PastaHR for selected job requisitions in Workday by assigning them a profile.","keywords":["Workday","profile","job requisition","custom object","integration system","field override"],"href":"/en/recruiters/workday-profile-selection"}}},"mdxSourceWithNoJs":null},"mdxExtracts":{"tableOfContents":[{"title":"Why you activate PastaHR per job requisition","slug":"why-you-activate-pastahr-per-job-requisition","depth":2,"children":[]},{"title":"How it works","slug":"how-it-works","depth":2,"children":[]},{"title":"Activate PastaHR for a job requisition (for recruiters)","slug":"activate-pastahr-for-a-job-requisition-for-recruiters","depth":2,"children":[]},{"title":"Setup (for Workday administrators)","slug":"setup-for-workday-administrators","depth":2,"children":[]},{"title":"Test the setup","slug":"test-the-setup","depth":2,"children":[]},{"title":"FAQ","slug":"faq","depth":2,"children":[]}],"codeExamples":{}},"jsLinks":[],"subdomain":"pastahr","siteName":"PastaHR","title":"Workday: Activate PastaHR for Job Requisitions - PastaHR","navMaps":{"firstHrefInVersion":{},"firstHrefInLanguage":{"de":{"href":"/recruiters/workday-profile-selection","matchLevel":1},"en":{"href":"/en/recruiters/workday-profile-selection","matchLevel":0},"fr":{"href":"/fr/recruiters/workday-profile-selection","matchLevel":1},"it":{"href":"/it/recruiters/workday-profile-selection","matchLevel":1}}},"lastModified":"2026-11-03T12:41:08.405Z","originalFileLocation":"en/recruiters/workday-profile-selection.mdx","locale":"en"},"headHtml":"\u003cscript data-mint-head>(function(){var d=document.documentElement,p=null;if(!p){try{p=localStorage.getItem(\"isDarkMode\")}catch(e){}if(p==='true')p='dark';else if(p==='false')p='light';if(p!=='light'\u0026\u0026p!=='dark'\u0026\u0026p!=='system')p=\"system\"}var r=p==='system'?(matchMedia(\"(prefers-color-scheme: dark)\").matches?'dark':'light'):p;d.classList.remove(r==='dark'?'light':'dark');d.classList.add(r);d.setAttribute(\"data-theme-preference\",p)})();\u003c/script>\u003cmeta data-mint-head name=\"description\" content=\"Activate PastaHR for selected job requisitions in Workday by assigning them a profile.\">\u003cmeta data-mint-head name=\"application-name\" content=\"PastaHR\">\u003cmeta data-mint-head name=\"generator\" content=\"Mintlify\">\u003clink data-mint-head rel=\"apple-touch-icon\" type=\"image/png\" sizes=\"180x180\" href=\"https://media.brand.dev/6b9b45da-633f-42d7-b73f-8baadf991ff1.png\">\u003clink data-mint-head rel=\"icon\" type=\"image/png\" sizes=\"32x32\" href=\"https://media.brand.dev/6b9b45da-633f-42d7-b73f-8baadf991ff1.png\">\u003clink data-mint-head rel=\"icon\" type=\"image/png\" sizes=\"16x16\" href=\"https://media.brand.dev/6b9b45da-633f-42d7-b73f-8baadf991ff1.png\">\u003clink data-mint-head rel=\"shortcut icon\" type=\"image/png\" href=\"https://media.brand.dev/6b9b45da-633f-42d7-b73f-8baadf991ff1.png\">\u003cmeta data-mint-head property=\"og:title\" content=\"Workday: Activate PastaHR for Job Requisitions - PastaHR\">\u003cmeta data-mint-head property=\"og:description\" content=\"Activate PastaHR for selected job requisitions in Workday by assigning them a profile.\">\u003cmeta data-mint-head property=\"og:site_name\" content=\"PastaHR\">\u003cmeta data-mint-head property=\"og:url\" content=\"https://docs.pastahr.com/en/recruiters/workday-profile-selection\">\u003cmeta data-mint-head property=\"og:type\" content=\"website\">\u003cmeta data-mint-head property=\"og:image\" content=\"https://pastahr.mintlify.app/_mintlify/api/og/v2?division=Workday\u0026amp;title=Workday%3A+Activate+PastaHR+for+Job+Requisitions\u0026amp;description=Activate+PastaHR+for+selected+job+requisitions+in+Workday+by+assigning+them+a+profile.\u0026amp;theme=1eb78e2b5223544e7c6c5a2c\u0026amp;signature=26cb9ec902e24e1687eb3bf95fa54b9c8f1e40f68061eee098d7ed6a607aa677\">\u003cmeta data-mint-head property=\"og:image:width\" content=\"1200\">\u003cmeta data-mint-head property=\"og:image:height\" content=\"630\">\u003cmeta data-mint-head name=\"twitter:card\" content=\"summary_large_image\">\u003cmeta data-mint-head name=\"twitter:title\" content=\"Workday: Activate PastaHR for Job Requisitions - PastaHR\">\u003cmeta data-mint-head name=\"twitter:description\" content=\"Activate PastaHR for selected job requisitions in Workday by assigning them a profile.\">\u003cmeta data-mint-head name=\"twitter:image\" content=\"https://pastahr.mintlify.app/_mintlify/api/og/v2?division=Workday\u0026amp;title=Workday%3A+Activate+PastaHR+for+Job+Requisitions\u0026amp;description=Activate+PastaHR+for+selected+job+requisitions+in+Workday+by+assigning+them+a+profile.\u0026amp;theme=1eb78e2b5223544e7c6c5a2c\u0026amp;signature=26cb9ec902e24e1687eb3bf95fa54b9c8f1e40f68061eee098d7ed6a607aa677\">\u003cmeta data-mint-head name=\"twitter:image:width\" content=\"1200\">\u003cmeta data-mint-head name=\"twitter:image:height\" content=\"630\">\u003cmeta data-mint-head name=\"msapplication-config\" content=\"https://mintlify.s3.us-west-1.amazonaws.com/pastahr/_generated/favicon/browserconfig.xml?v=3\">\u003cmeta data-mint-head name=\"apple-mobile-web-app-title\" content=\"PastaHR\">\u003cmeta data-mint-head name=\"msapplication-TileColor\" content=\"#3b82f6\">\u003clink data-mint-head rel=\"canonical\" href=\"https://docs.pastahr.com/en/recruiters/workday-profile-selection\">\u003clink data-mint-head rel=\"alternate\" type=\"application/xml\" href=\"/sitemap.xml\">\u003clink data-mint-head rel=\"alternate\" type=\"text/markdown\" href=\"/en/recruiters/workday-profile-selection.md\">\u003clink data-mint-head rel=\"alternate\" hreflang=\"en\" href=\"https://docs.pastahr.com/en/recruiters/workday-profile-selection\">\u003clink data-mint-head rel=\"alternate\" hreflang=\"de\" href=\"https://docs.pastahr.com/recruiters/workday-profile-selection\">\u003clink data-mint-head rel=\"alternate\" hreflang=\"fr\" href=\"https://docs.pastahr.com/fr/recruiters/workday-profile-selection\">\u003clink data-mint-head rel=\"alternate\" hreflang=\"it\" href=\"https://docs.pastahr.com/it/recruiters/workday-profile-selection\">\u003clink data-mint-head rel=\"alternate\" hreflang=\"x-default\" href=\"https://docs.pastahr.com/recruiters/workday-profile-selection\">\u003cscript data-mint-head type=\"application/ld+json\">{\"@context\":\"https://schema.org\",\"@graph\":[{\"@type\":\"Organization\",\"@id\":\"https://docs.pastahr.com/#organization\",\"name\":\"PastaHR\",\"url\":\"https://docs.pastahr.com\",\"logo\":{\"@type\":\"ImageObject\",\"url\":\"https://pastahr-static.s3.eu-central-1.amazonaws.com/logos/Logo_base.png\"}},{\"@type\":\"WebSite\",\"@id\":\"https://docs.pastahr.com#website\",\"name\":\"PastaHR\",\"url\":\"https://docs.pastahr.com\",\"publisher\":{\"@id\":\"https://docs.pastahr.com/#organization\"}},{\"@type\":\"WebPage\",\"@id\":\"https://docs.pastahr.com/en/recruiters/workday-profile-selection#webpage\",\"url\":\"https://docs.pastahr.com/en/recruiters/workday-profile-selection\",\"name\":\"Workday: Activate PastaHR for Job Requisitions\",\"description\":\"Activate PastaHR for selected job requisitions in Workday by assigning them a profile.\",\"dateModified\":\"2026-11-03T12:41:08.405Z\",\"isPartOf\":{\"@id\":\"https://docs.pastahr.com#website\"},\"breadcrumb\":{\"@id\":\"https://docs.pastahr.com/en/recruiters/workday-profile-selection#breadcrumb\"}},{\"@type\":\"BreadcrumbList\",\"@id\":\"https://docs.pastahr.com/en/recruiters/workday-profile-selection#breadcrumb\",\"itemListElement\":[{\"@type\":\"ListItem\",\"position\":1,\"name\":\"ATS Integrations\",\"item\":\"https://docs.pastahr.com/en/recruiters/ats-overview\"},{\"@type\":\"ListItem\",\"position\":2,\"name\":\"Workday\",\"item\":\"https://docs.pastahr.com/en/recruiters/workday\"},{\"@type\":\"ListItem\",\"position\":3,\"name\":\"Workday: Activate PastaHR for Job Requisitions\",\"item\":\"https://docs.pastahr.com/en/recruiters/workday-profile-selection\"}]},{\"@type\":[\"Article\",\"TechArticle\"],\"@id\":\"https://docs.pastahr.com/en/recruiters/workday-profile-selection#article\",\"headline\":\"Workday: Activate PastaHR for Job Requisitions\",\"name\":\"Workday: Activate PastaHR for Job Requisitions\",\"description\":\"Activate PastaHR for selected job requisitions in Workday by assigning them a profile.\",\"url\":\"https://docs.pastahr.com/en/recruiters/workday-profile-selection\",\"mainEntityOfPage\":{\"@id\":\"https://docs.pastahr.com/en/recruiters/workday-profile-selection#webpage\"},\"dateModified\":\"2026-11-03T12:41:08.405Z\",\"keywords\":\"Workday, profile, job requisition, custom object, integration system, field override\",\"publisher\":{\"@id\":\"https://docs.pastahr.com/#organization\"},\"isPartOf\":{\"@id\":\"https://docs.pastahr.com#website\"}}]}\u003c/script>\u003cscript data-mint-head type=\"application/ld+json\">{\"@context\":\"https://schema.org\",\"@type\":\"WebSite\",\"name\":\"PastaHR\",\"creator\":{\"@type\":\"Organization\",\"name\":\"Mintlify\",\"url\":\"https://mintlify.com\"}}\u003c/script>","siteName":"PastaHR","nav":{"global":null,"languages":[{"language":"de","default":true,"pages":[{"title":"de","href":"/recruiters/workday-profile-selection"}]},{"language":"en","tabs":[{"tab":"For Recruiters","icon":"readme","groups":[{"group":"Get Started","pages":[{"title":"Welcome to PastaHR","sidebarTitle":"Introduction","href":"/en/recruiters/introduction"},{"title":"Onboarding","hidden":true,"sidebarTitle":"Onboarding","href":"/en/recruiters/onboarding"},{"title":"Application Flows: What They Are and How They Work","sidebarTitle":"Flows","href":"/en/recruiters/application-flows"},{"title":"Privacy Policy for Applicants: Which Rules Apply","sidebarTitle":"Privacy Policy for Applicants","href":"/en/recruiters/privacy-policy-applicants"},{"title":"Set Up a WhatsApp Channel","sidebarTitle":"WhatsApp Channel","href":"/en/recruiters/whatsapp-channel"}]},{"group":"Account \u0026 Team","pages":[{"title":"Log In to PastaHR: Email Code and MFA","sidebarTitle":"Login","href":"/en/recruiters/login"},{"title":"Add Team Members to PastaHR","sidebarTitle":"Add Team Members","href":"/en/recruiters/add-team-members"},{"title":"PastaHR Roles: Admin, Recruiter, and Permissions","sidebarTitle":"Roles","href":"/en/recruiters/roles"},{"title":"Enable Multi-Factor Authentication (MFA) in PastaHR","sidebarTitle":"MFA","href":"/en/recruiters/mfa"},{"title":"Single Sign-On (SSO) with PastaHR: Supported Options","sidebarTitle":"SSO","href":"/en/recruiters/sso-overview"},{"title":"Single Sign-On for PastaHR via Microsoft Entra ID","sidebarTitle":"Microsoft Entra ID","href":"/en/recruiters/sso"}]},{"group":"Applications","pages":[{"title":"How to Manage All Incoming Applications in PastaHR","sidebarTitle":"Managing Applications","href":"/en/recruiters/managing-applications"},{"title":"Set Up and Customise Application Phases in PastaHR","sidebarTitle":"Application Phases","href":"/en/recruiters/application-phases"},{"title":"Sharing Applications Securely with External Reviewers","sidebarTitle":"Share Applications","href":"/en/recruiters/share-applications"},{"title":"Configure PastaHR Notifications for Your Recruiter Team","sidebarTitle":"Notifications","href":"/en/recruiters/notifications"}]},{"group":"Chat","pages":[{"title":"Inbox","sidebarTitle":"Inbox","href":"/en/recruiters/chat-overview"},{"title":"How to Assign Candidate Chats to Team Members in PastaHR","sidebarTitle":"Chat Assign","href":"/en/recruiters/chat-assign"},{"title":"FAQ Chat Mode: Automatic Answers to Common Questions","sidebarTitle":"FAQ Chat Mode","href":"/en/recruiters/faq-chat-mode"},{"title":"Message Templates: Faster, Consistent Candidate Replies","sidebarTitle":"Message Templates","href":"/en/recruiters/message-templates"},{"title":"Chat Without an Application: Let Prospects Ask Questions","sidebarTitle":"Chat Without an Application","href":"/en/recruiters/standalone-chat"}]},{"group":"AI Screening (JobFit)","pages":[{"title":"AI Screening with JobFit: How Candidate Scoring Works","sidebarTitle":"AI Screening","href":"/en/recruiters/ai-screening"},{"title":"AI-Generated Candidate Summaries: What They Include","sidebarTitle":"AI Summaries","href":"/en/recruiters/ai-summaries"},{"title":"JobFit and AI Summary in Your ATS","sidebarTitle":"JobFit in Your ATS","href":"/en/recruiters/jobfit-im-ats"},{"title":"EU AI Act transparency","sidebarTitle":"EU AI Act","href":"/en/recruiters/ai-act-transparency"}]},{"group":"Marketing \u0026 Campaigns","pages":[{"title":"Landing Pages: Create Dedicated Job Campaign Pages","sidebarTitle":"Landing Pages","href":"/en/recruiters/landing-pages"},{"title":"UTM Tracking: Measure Every Candidate Source Channel","sidebarTitle":"UTM Tracking","href":"/en/recruiters/utm-tracking"}]},{"group":"Career Page \u0026 Links","pages":[{"title":"Application Links: Build, Share, and Track Your URLs","sidebarTitle":"Application Links","href":"/en/recruiters/application-links"},{"title":"Career Page Widget: Embed PastaHR on Your Careers Site","sidebarTitle":"Career Page Widget","href":"/en/recruiters/career-page-widget"}]},{"group":"ATS Integrations","pages":[{"title":"ATS Integrations Overview: Connect Your Hiring System","sidebarTitle":"ATS Overview","href":"/en/recruiters/ats-overview"},{"title":"SAP SuccessFactors Integration: Setup and Behaviour","sidebarTitle":"SuccessFactors","href":"/en/recruiters/successfactors"},{"title":"Umantis: Set Up an Apply Button","sidebarTitle":"Umantis","href":"/en/recruiters/umantis"},{"title":"ATS Integration Troubleshooting: Fix Common Issues","sidebarTitle":"Troubleshooting","href":"/en/recruiters/ats-troubleshooting"},{"group":"Workday","pages":[{"title":"Workday: Integration with PastaHR","sidebarTitle":"Workday: Integration","description":"How to connect Workday to PastaHR and what the integration does for you.","href":"/en/recruiters/workday"},{"title":"Workday: Activate PastaHR for Job Requisitions","sidebarTitle":"Workday: Activate PastaHR","href":"/en/recruiters/workday-profile-selection"}]}]},{"group":"Interview Booking","pages":[{"title":"Configure Interview Booking Types","sidebarTitle":"Interview Booking Types","description":"Interview types are the foundation of PastaHR's booking system: configure basics, availability, limits, assigned users, message templates, and calendar integration.","href":"/en/recruiters/interview-types"},{"title":"Interview Booking: Schedule Candidates Effortlessly","sidebarTitle":"Interview Booking","href":"/en/recruiters/interview-booking"},{"title":"Connect Your Calendar for PastaHR Interview Scheduling","sidebarTitle":"Connect Calendar","href":"/en/recruiters/connect-calendar"}]},{"group":"Insights","pages":[{"title":"Recruiting Insights: Understand Your Pipeline Performance","sidebarTitle":"Insights","href":"/en/recruiters/insights"},{"title":"Weekly Insights: Recruiting Metrics Delivered by Email","sidebarTitle":"Weekly Insights","href":"/en/recruiters/weekly-insights"},{"title":"Connect Facebook Pixel with PastaHR","sidebarTitle":"Facebook Pixel","href":"/en/recruiters/facebook-pixel"},{"title":"Downloading a HAR Report","sidebarTitle":"HAR Report","href":"/en/recruiters/har-report"},{"title":"Setting Up Tracking Pixels from Job Boards","sidebarTitle":"Tracking Pixel","href":"/en/recruiters/job-board-tracking-pixel"}]},{"group":"Privacy \u0026 Security","hidden":true,"pages":[{"title":"Data Storage: Security, Compliance, and Certification","sidebarTitle":"Data Storage","href":"/en/recruiters/data-storage"},{"title":"WhatsApp Recruiting: GDPR and DSG Compliance in PastaHR","sidebarTitle":"WhatsApp \u0026 GDPR","href":"/en/recruiters/whatsapp-gdpr"}]}]}]},{"language":"fr","pages":[{"title":"fr","href":"/fr/recruiters/workday-profile-selection"}]},{"language":"it","pages":[{"title":"it","href":"/it/recruiters/workday-profile-selection"}]}]},"basePath":"","title":"Workday: Activate PastaHR for Job Requisitions - PastaHR","buildId":"dpl_36EDyZCDfRuoUD9af5CH4M1bqY2h","deploymentId":"dpl_36EDyZCDfRuoUD9af5CH4M1bqY2h","dynamics":["07c022d89b","a74be98ba7"],"chunks":["Frame-DW6UFrUy.js","DynamicMarkdown-B62XqCSI.js","zoom-image-lightbox-eHyQ0tlO.js","lightbox-handle-r17bVUz3.js"]}