> ## Documentation Index
> Fetch the complete documentation index at: https://docs.pastahr.com/llms.txt
> Use this file to discover all available pages before exploring further.
# Workday Integration: Setup, remote_job_id, and JobFit
> Connect PastaHR to Workday to forward applications automatically and display JobFit scores in the Workday candidate overview grid.
PastaHR integrates with Workday, so every application lands in the environment you already use. You can also display PastaHR's JobFit directly in Workday's candidate list view.
## Finding Your remote\_job\_id in Workday
The easiest way to find the `remote_job_id` is through PastaHR itself: open the **Jobs** page in the PastaHR web app, find the job you're looking for, and copy the job ID shown there. The Workday Integration IDs approach described below is an alternative if you'd rather look it up directly in Workday.
Every Workday position has a unique identifier that PastaHR uses to match incoming applications to the right job requisition. For Workday, this is the **Workday ID** found in the requisition's integration settings.
Navigate to the job requisition you want to use.
Inside the requisition, click **Integration IDs** then **View IDs**.
The Workday ID displayed here is the value to use as `remote_job_id` in your PastaHR application link.
Once you have the ID, add it as the `remote_job_id` parameter in your PastaHR application link, or set it as the default ID in your flow settings. For full details on how `remote_job_id` works, see [Application Links](/en/recruiters/application-links).
## Adding JobFit Score to the Candidate Overview
You can display the JobFit score and all factors directly in Workday's candidate overview, so recruiters can compare candidates at a glance without switching between systems.
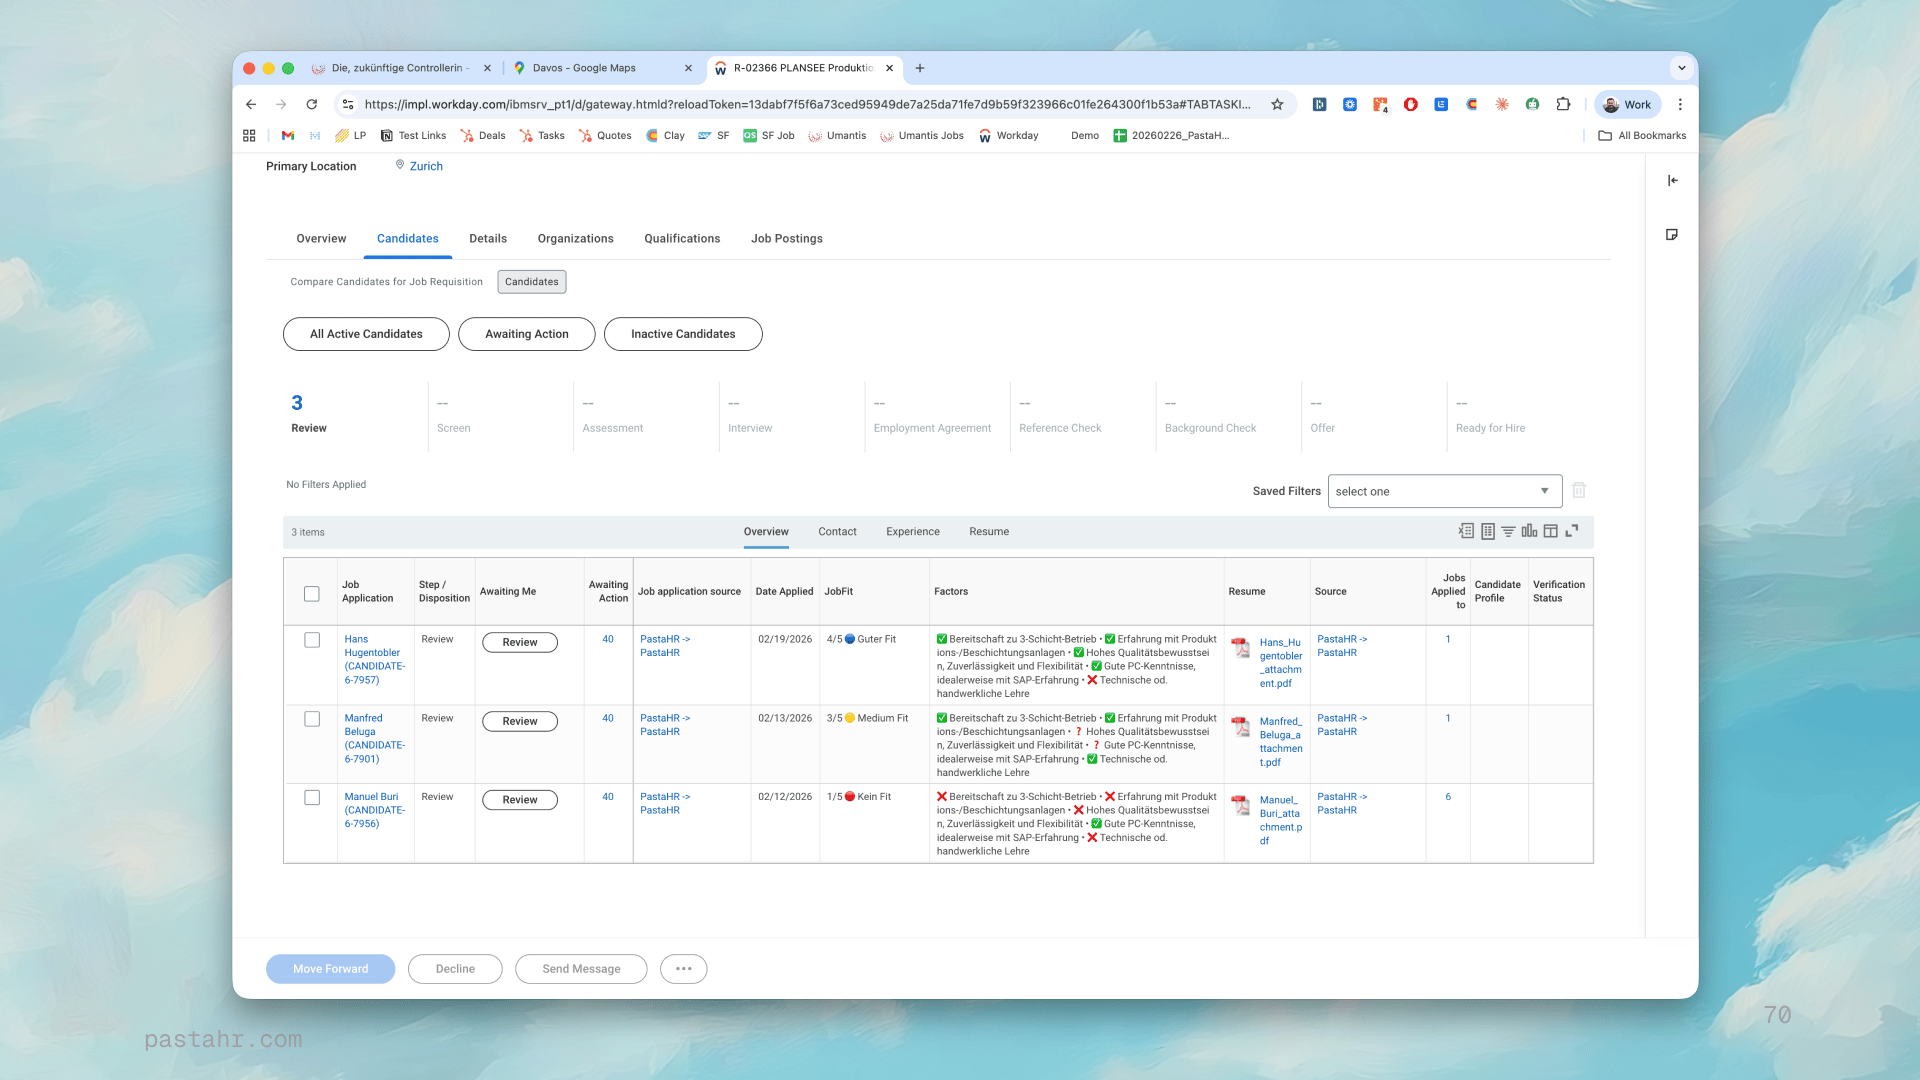 In Workday's search bar, type **Edit Grid Configuration** and select it from the results.
If prompted to choose a grid, select **Default Candidate List Grid** and press **OK**.
In the grid editor, locate the **Overview** section. Click the **+** icon on an existing row to add a new Grouped Column.
Set the following values for the newly added row:
| Field | Value |
| ------------------- | ---------------------------------------------------- |
| **Business Object** | Job Application |
| **Field** | The custom object created for JobFit (e.g. `JobFit`) |
| **Display Name** | A label of your choice, e.g. *JobFit* |
Repeat the previous step and also add the field for the JobFit factors if you'd like those displayed as well.
Save the grid configuration. Return to the candidate list view for an active requisition and confirm the JobFit column appears and is populated for candidates who applied through PastaHR.
Let PastaHR know the details of the custom objects you created, so the fields get populated automatically on applications.
The integration can be customised to your Workday instance and preferences. Contact [support@pastahr.com](mailto:support@pastahr.com) for more details.
In Workday's search bar, type **Edit Grid Configuration** and select it from the results.
If prompted to choose a grid, select **Default Candidate List Grid** and press **OK**.
In the grid editor, locate the **Overview** section. Click the **+** icon on an existing row to add a new Grouped Column.
Set the following values for the newly added row:
| Field | Value |
| ------------------- | ---------------------------------------------------- |
| **Business Object** | Job Application |
| **Field** | The custom object created for JobFit (e.g. `JobFit`) |
| **Display Name** | A label of your choice, e.g. *JobFit* |
Repeat the previous step and also add the field for the JobFit factors if you'd like those displayed as well.
Save the grid configuration. Return to the candidate list view for an active requisition and confirm the JobFit column appears and is populated for candidates who applied through PastaHR.
Let PastaHR know the details of the custom objects you created, so the fields get populated automatically on applications.
The integration can be customised to your Workday instance and preferences. Contact [support@pastahr.com](mailto:support@pastahr.com) for more details.